
There is a small Mac privacy problem that comes up more often than people expect: one part of one window needs to disappear.
Not the whole app. Not the whole desktop. Just one area.
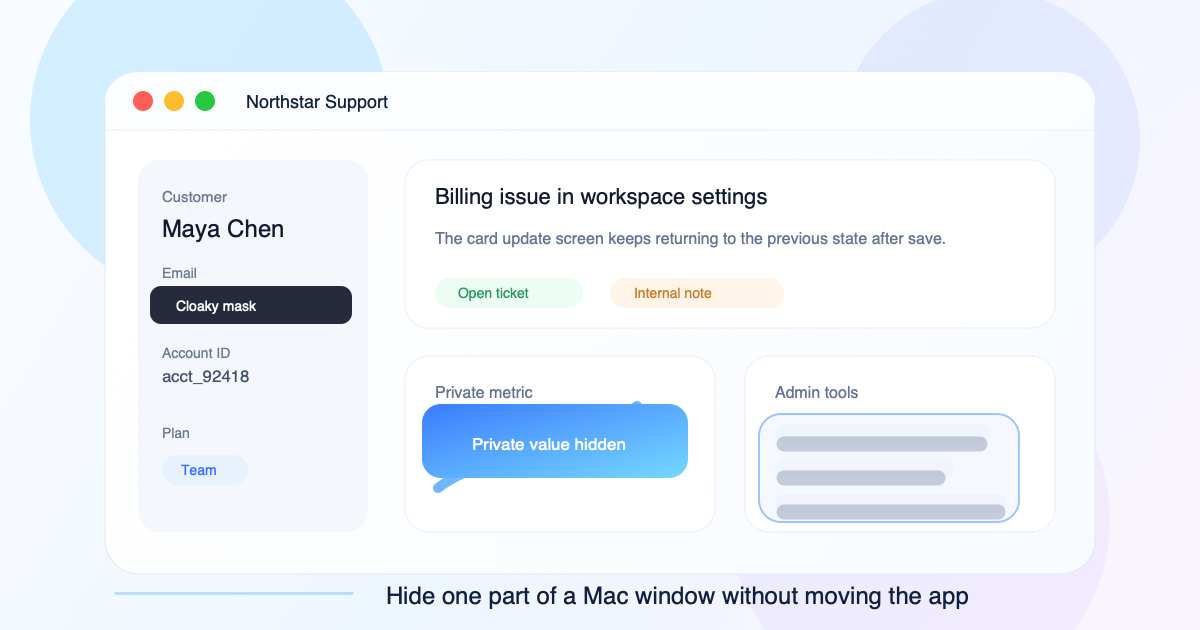
Maybe the window has a support ticket open and only the customer’s email should stay hidden. Maybe a dashboard is useful except for the balance in the corner. Maybe a browser view has the page you need, plus an internal admin bar you do not want in view. Or maybe the issue is not privacy at all, but a sidebar, timer, chat column, or status panel that keeps pulling your attention away.
The awkward part is that the window is already where it should be. You do not want to resize it, crop it, move it off screen, or edit the app underneath. You only want to cover, blur, or dim the specific part that is in the way.
That is exactly where a Mac window overlay helps.
Mac window controls are too coarse
Mac apps are usually designed as complete windows. You can minimize the whole app, close the whole window, hide the whole app, or move the whole thing somewhere else.
Those controls are useful, but they are too coarse when the problem is one field, one panel, or one corner.
A single browser window may contain a useful chart and a private account name. A support tool may show the ticket flow and a customer’s personal details. A project management app may show the task you need and an internal roadmap label. A dashboard may show the graph you are discussing and the number you do not want in view.
When only one part of the window is the problem, hiding the whole app is too much.
That is where a window overlay is useful. Instead of changing the app underneath, you place a mask above the specific area you want to hide.
Common workarounds and why they break down
Before using a dedicated screen mask, people usually try a few manual workarounds.
Resize the window
If the private area is near the edge, you can sometimes resize the window until that part disappears.
This works only when the app layout cooperates. Many apps respond to resizing by moving content, collapsing sidebars, or changing the page layout. You may hide one field and accidentally change the whole workflow.
It also makes your workspace less stable. The window no longer has the size you actually want.
Move the window partly off screen
Another trick is to drag the window so the sensitive area sits beyond the edge of the display.
This can work for a quick moment, but it is clumsy. You lose part of the app, the window becomes harder to use, and one accidental move can bring the private area back.
It also looks messy during reviews, presentations, or any workflow where someone else can see your screen.
Cover it with another window
You can drag a Notes window, Finder window, blank browser tab, or text editor over the sensitive area.
This is the classic emergency fix, but it has problems. The covering window can steal focus, show its title bar, receive clicks, appear in Mission Control, or move when you do not expect it to.
It looks like a workaround because it is one.
Change the app or data
Sometimes you can hide a column, switch accounts, change browser profiles, use demo data, or turn off a panel inside the app.
That is often a good idea when the app supports it. But it also changes the actual workspace. You may lose context, break the layout, or spend time rebuilding the same setup later.
When the app is already arranged correctly, a mask can be simpler.
Use a Mac window overlay instead
A window overlay lets you place a visual layer above part of a window while leaving the app underneath unchanged.
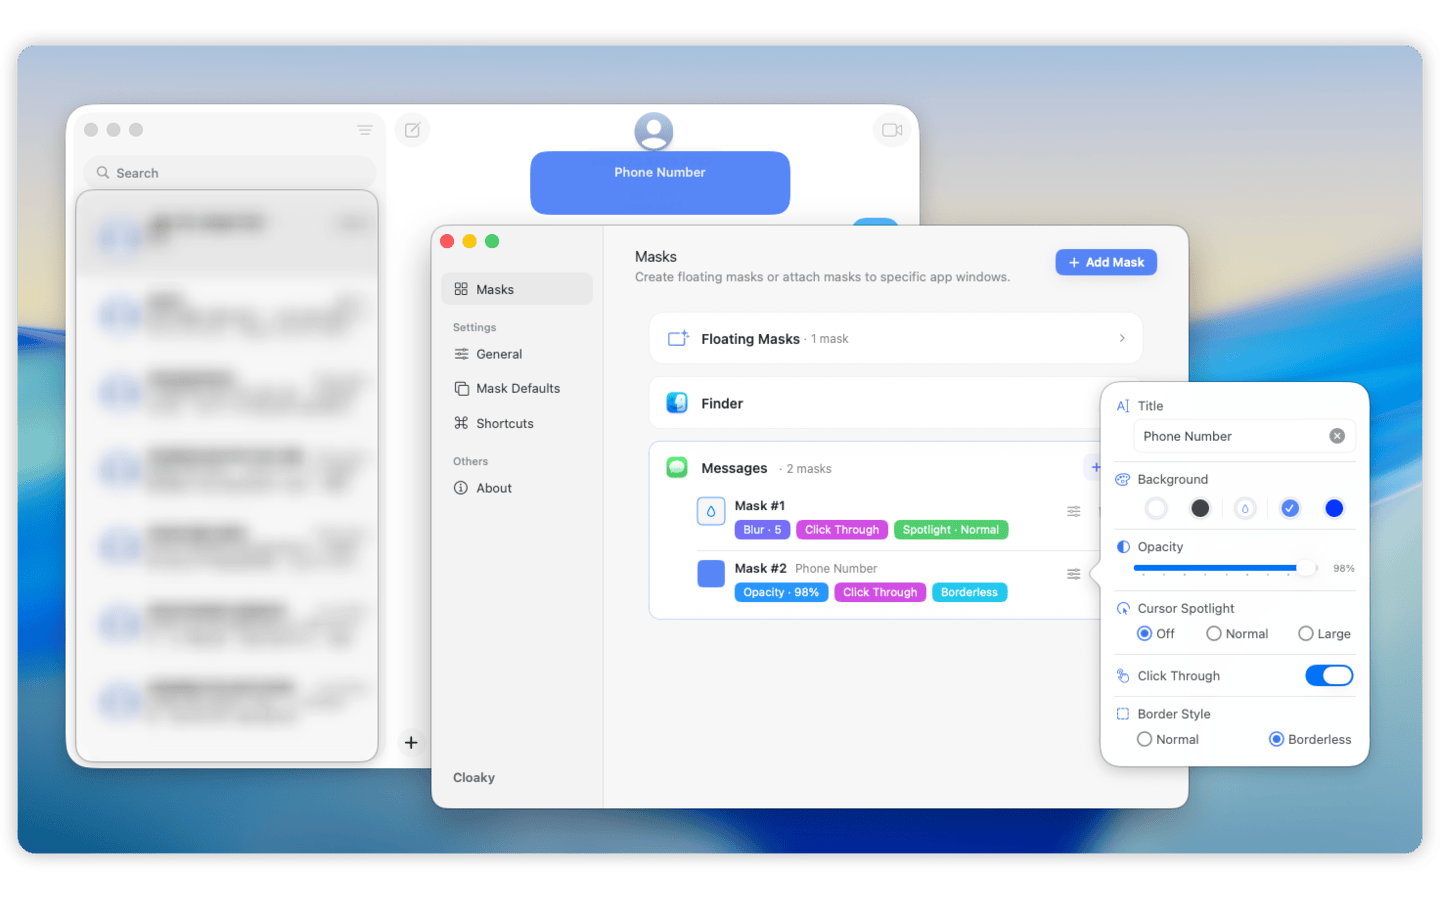
With Cloaky, you can create masks that cover, blur, dim, or spotlight selected areas of your Mac screen. Use floating masks for fixed screen areas, or attach masks to app windows when the hidden area belongs to a specific window.
That means you can hide the part you do not want to see while keeping the rest of the app usable.
For example:
- Cover a customer email in a support app.
- Blur a balance in a finance dashboard.
- Hide an internal admin sidebar in a browser.
- Dim a noisy chat column while keeping the main workspace visible.
- Cover a project name, account ID, private URL, or internal label.
- Keep a sensitive area hidden while moving the app window around.
Cloaky is intentionally not a page editor. It does not hide a DOM element, rewrite a dashboard, or change the source app. It draws a mask on top of what you see, so the window underneath stays as-is.
Floating masks vs app-attached masks
Cloaky supports two common masking patterns.
Floating masks
A floating mask stays in a fixed area of your screen.
Use this when the sensitive area is always in the same place on the display, such as a corner widget, status panel, menu area, notification region, or a dashboard that you keep positioned consistently.
Floating masks are simple and fast. If the window moves, though, the mask stays where it was.
App-attached masks
An app-attached mask follows a specific app window.
Use this when the hidden area belongs to that window. If you move the window, the mask can move with it, so the private field stays covered.
This matters for real work because Mac windows rarely stay perfectly still. You may move a browser, resize a dashboard, switch between displays, or reposition a tool during a presentation or review.
If the private area is part of the app window, attach the mask to the app window.
How to hide part of a window with Cloaky
The setup is short.
1. Open the app window you want to use
Start with the real window in the position and size you normally use.
Do not redesign the workspace just to hide one field. The point of a screen mask is to keep the useful layout intact.
2. Identify the smallest area that needs to be hidden
Choose the exact field, panel, or region that should disappear.
Good candidates include:
- Emails, names, avatars, and account IDs
- Balances, costs, revenue, and private metrics
- Internal URLs, project names, labels, and admin controls
- Sidebars, chat columns, and notification regions
- Any area that is private, irrelevant, or distracting
Smaller masks usually feel better. They hide the problem without making the app feel blocked.
3. Add a mask
Create a mask over the selected area.
Use a floating mask if the area stays fixed on the display. Use an app-attached mask if the area belongs to a window and should move with that window.
Add a small margin around the hidden content so text does not leak around the edge.
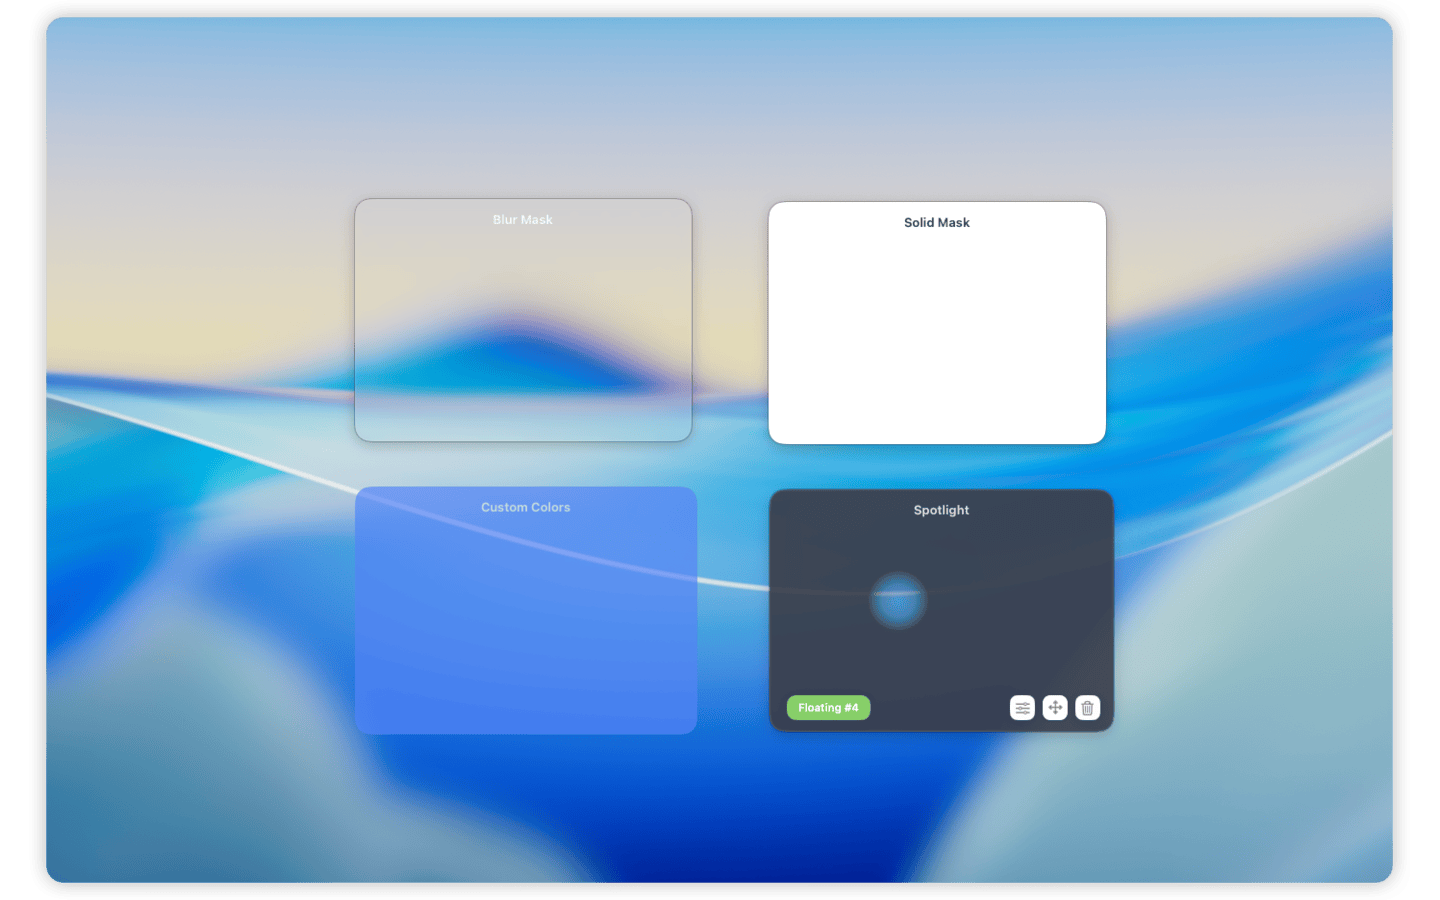
4. Choose cover, blur, or dim
Use a solid cover when the information must not be readable.
Use blur when you want the viewer to understand the layout but not the details.
Use dimming when privacy is not the goal and you simply want a distracting part of the window to stop pulling attention.
5. Tune interaction
If you still need to click through the area underneath, use click-through behavior where it fits your workflow.
If you often hide the same fields, set up shortcuts or reuse the same mask style so the workflow stays fast.
The best screen mask should feel boring. It should quietly cover the right area and let you keep working.
When this is useful
Hiding part of a window is useful when one area is private, irrelevant, or distracting but the rest of the app should stay visible.
Internal demos and reviews
Internal tools often show more than one audience needs to see.
You may want to show the workflow while hiding customer details, internal labels, revenue numbers, feature flags, or admin controls.
A window-attached mask helps you keep the real workspace visible without exposing every field.
Presentations and live walkthroughs
Dashboards, browsers, and product tools often include private sidebars or account-specific details.
Instead of resizing the app or changing the data, you can cover the sensitive area and keep the walkthrough focused.
Support and operations work
Support tools, admin panels, logs, and back-office systems often mix useful context with personal data.
Masks let you keep the ticket, workflow, or log visible while hiding names, emails, account IDs, and other fields that do not need to be seen.
Focus work
Not every mask is about privacy.
Sometimes you want to hide a sidebar, score, chat column, timer, status panel, or other visual cue because it keeps interrupting your attention.
Dimming or covering that area can make the same app easier to use.
A note about screen sharing modes
If you share your full screen, a mask appears as part of what is visible on your display.
If a meeting tool captures only a specific app window, it may capture the source app directly instead of the full display where Cloaky draws its overlay. In that mode, overlays may not appear.
For sensitive information, test the exact sharing mode before relying on any overlay. Full-screen sharing is the safer mode when you need the mask to be visible to others.
FAQ
Can I hide only part of a Mac app window?
Yes. Cloaky lets you place a mask over a selected area while the rest of the window remains visible.
Can the mask follow a window when I move it?
Yes. Use an app-attached mask when the hidden area belongs to a specific app window.
Can I blur part of a browser window on Mac?
Yes. You can place a blur mask over part of a browser window, such as an account name, admin bar, private URL, sidebar, or dashboard field.
Does Cloaky change the app underneath?
No. Cloaky draws an overlay above the screen. The original app, page, dashboard, or document stays unchanged.
Should I use blur or a solid cover?
Use blur when you want the layout to remain understandable. Use a solid cover when the information must not be readable.
Will this work when sharing only one app window?
Not always. Some meeting tools capture the app window directly and may not include overlays. Test first, or use full-screen sharing when the mask must be visible.
Hide the problem, keep the workspace
You should not have to rearrange an entire Mac workspace just because one field, panel, or sidebar should stay out of view.
Cloaky gives you a fast way to hide part of a window with a live Mac screen overlay. Cover, blur, or dim the specific area that matters, keep the useful parts visible, and leave the app underneath unchanged.
For a broader overview, see how to cover or blur part of your Mac screen and how to hide sensitive information while screen sharing on Mac.