Screen sharing is useful until one small part of your Mac screen shows something it should not.
It might be a customer email in a support tool, a revenue number in a dashboard, a private Slack message, an account name, a token in a terminal, an internal URL, or a sidebar that reveals more than the meeting needs. The rest of the screen is fine. One area is the problem.
This guide explains practical ways to hide sensitive information while screen sharing on Mac, what each option is good for, and when a live screen mask is the cleaner choice.
Why screen sharing privacy is hard on Mac
Most Mac workflows are not built around perfectly sanitized demo screens.
Real work happens inside real browsers, real dashboards, real admin panels, real spreadsheets, real terminals, and real messaging apps. Those screens often mix useful context with private details.
That creates a common screen sharing problem: you do not want to hide the whole app, but you also cannot expose every field inside it.
For example:
- A sales dashboard has the chart you want to discuss, plus private revenue details.
- A support ticket has the issue history, plus the customer’s name and email.
- A browser tab has the product page, plus an internal admin bar.
- A terminal has the command you want to show, plus tokens, paths, or project names.
- A meeting display has the document you need, plus notification previews.
The goal is not always to make the entire screen private. The goal is to keep the useful parts visible while hiding the parts that should not be seen.
Before the call: reduce accidental exposure
The best screen sharing privacy setup starts before the meeting begins.
Close apps you do not need. Quit messaging apps if they might show notifications. Hide browser bookmark bars if they reveal internal projects. Move private windows to another desktop. Use a clean browser profile when the demo does not require your normal session.
Also check what you are about to share:
- Full display
- One app window
- One browser tab
- A specific presentation window
Each sharing mode behaves differently. Full-display sharing shows what is visually on the screen. Single-window sharing may capture the app window directly, which can behave differently from what you see on the display.
If the information is genuinely sensitive, test the exact meeting app and sharing mode before the real call.
Option 1: Share only one window or tab
Most meeting tools let you share a single window or browser tab. This is often the simplest privacy improvement.
It works well when the sensitive information lives outside the thing you are presenting. For example, sharing one browser tab can keep your desktop, other apps, and notifications out of view.
The downside is that single-window sharing does not help when the private detail is inside the same window you need to show.
If a dashboard contains both the chart and the private metric, sharing that window still exposes both. If a support tool contains both the conversation and the customer email, sharing that window still exposes both.
Use single-window sharing when the problem is outside the window. Use another approach when the problem is inside the window.
Option 2: Crop, zoom, or resize the window
You can sometimes hide private information by resizing the app, zooming into a section, or moving the window so the sensitive area is off screen.
This can work for a quick call, especially when the content you want is already near the center of the window.
But it is fragile. Layouts shift. Sidebars reopen. Responsive pages rearrange content. A private field that was hidden a minute ago can come back after a refresh, resize, or navigation change.
Cropping and zooming can also make the demo harder to follow. Viewers may lose the surrounding context, and you may spend the meeting managing the window instead of explaining the work.
Option 3: Use a blank window as a cover
A common workaround is to drag another window over the sensitive area: a blank note, a Finder window, a text editor, or a small browser window.
This can hide information quickly, but it usually feels improvised.
The covering window can take focus, show its own title bar, receive clicks, appear in the app switcher, or move when you do not expect it to. It may also look unpolished in customer demos, tutorials, product reviews, and recorded walkthroughs.
For a one-time emergency, a blank window can help. For repeated screen sharing, it is usually not the best tool.
Option 4: Blur or cover sensitive areas with a screen mask
A screen mask is designed for the smaller, more common problem: hide one part of the Mac screen while the rest remains usable.
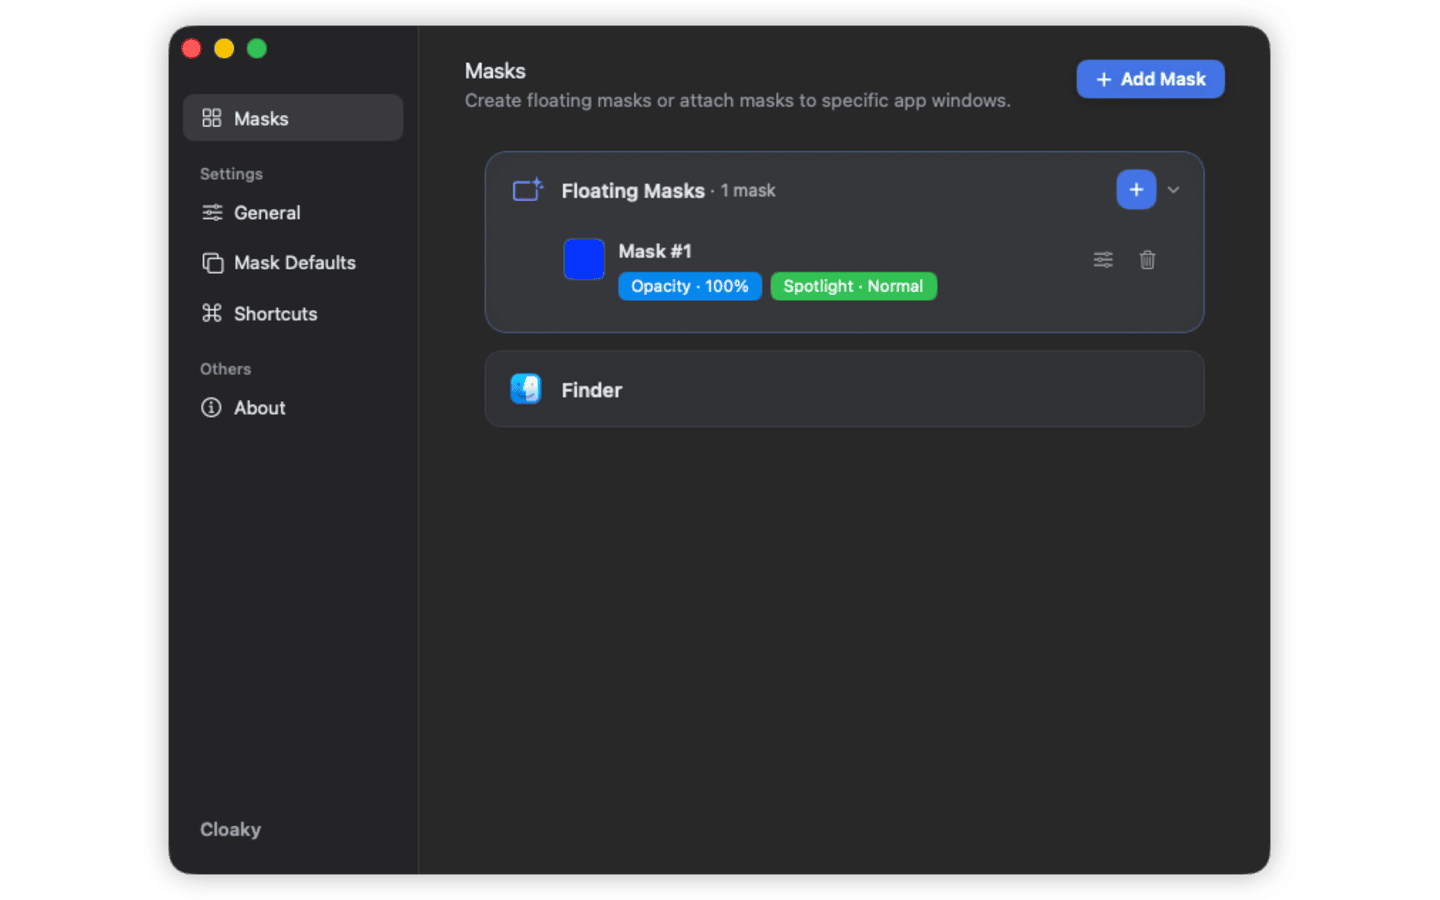
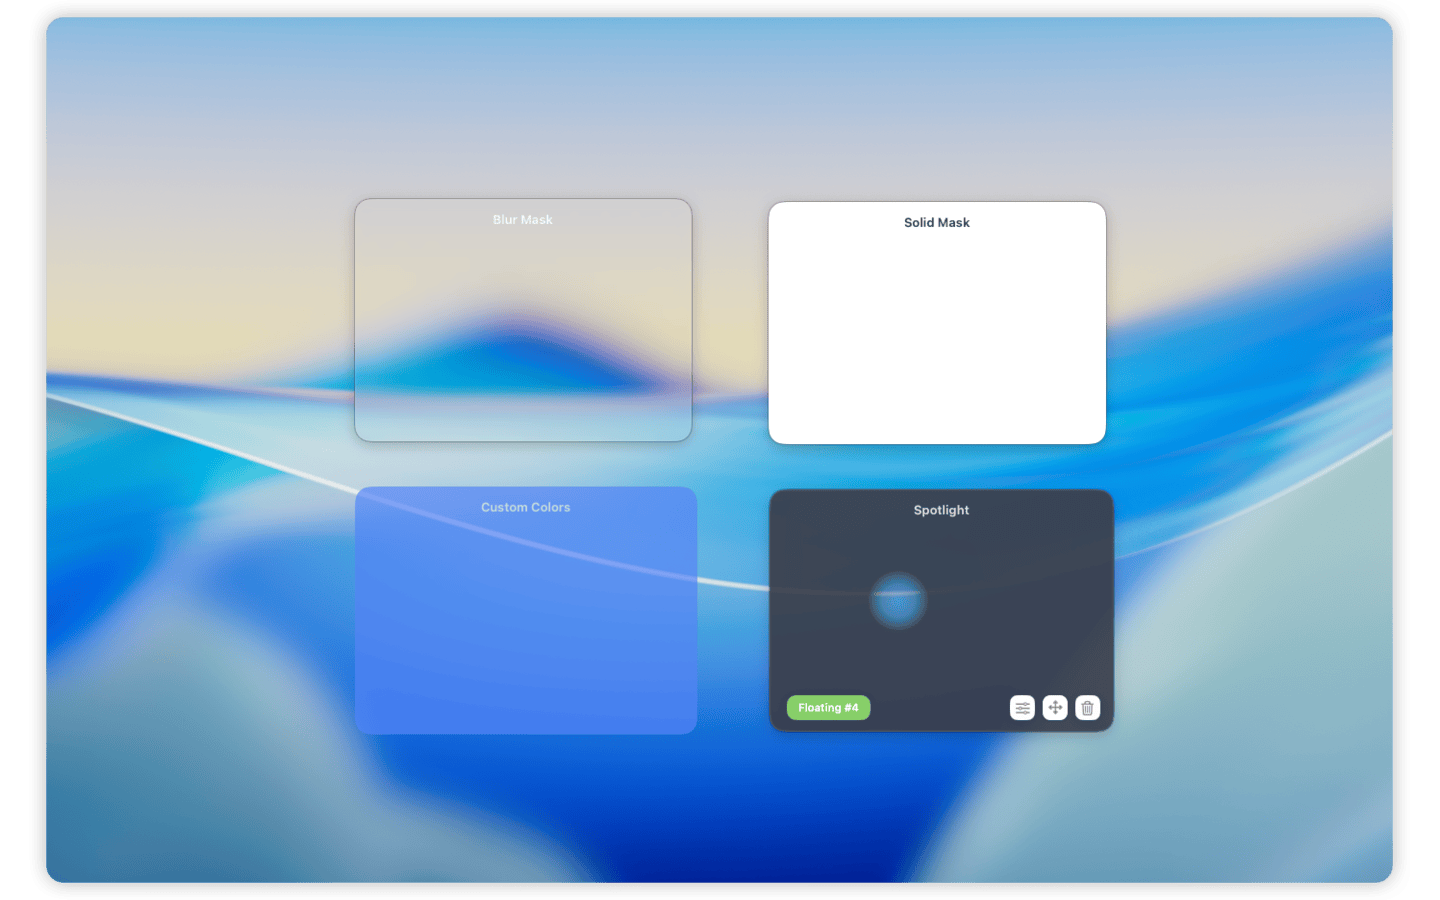
With Cloaky, you can place a live mask over a selected area and choose how it should look. Use a solid cover when the information must not be readable. Use blur when you want the layout to remain understandable but the details to disappear. Use dimming when the goal is focus rather than privacy.
This is useful for:
- Customer names, emails, avatars, and account IDs
- Revenue, balances, analytics, and private metrics
- API keys, tokens, internal URLs, and project paths
- Admin navigation, internal controls, and feature flags
- Chat previews, notification areas, and side panels
- Anything distracting that pulls attention away from the topic
The app underneath stays unchanged. You are not editing the product, rebuilding demo data, or rearranging the whole workspace because one field needs to disappear.
How to hide sensitive information while screen sharing with Cloaky
Here is a simple workflow for live calls, demos, and recordings.
1. Pick the exact area to hide
Start with the smallest area that solves the privacy problem.
If you only need to hide an email address, cover the email address. If you only need to hide a balance, cover the balance. A tighter mask keeps the screen more useful and makes the presentation easier to follow.
Add a small margin around the sensitive field so text does not leak around the edge.
2. Choose the right mask style
Use a solid cover for anything that must not be readable at all, such as tokens, customer data, private financial numbers, internal IDs, or account details.
Use blur when the content should be hidden but the viewer can still benefit from understanding the shape of the interface.
Use dimming when the content is not private but is visually distracting, such as a sidebar, notification area, scoreboard, timer, or chat column.
3. Decide whether the mask should float or follow a window
Use a floating mask when the sensitive area stays in the same place on your display.
Use an app-attached mask when the sensitive area belongs to a specific app window and should move with it. This is useful when you may reposition the window during a call but still want the private field to stay covered.
4. Test the sharing mode
Before a real meeting, start a quick test call or recording and confirm that the mask appears in the captured output.
Full-display sharing usually captures the mask because it is visible on screen. Single-window sharing may behave differently depending on the meeting app, because some tools capture the app window directly instead of the full display.
If the hidden information is sensitive, do not rely on assumptions. Test the exact app, exact sharing mode, and exact screen setup you plan to use.
5. Keep a reusable setup for repeated calls
If you often share the same dashboard, support tool, admin panel, or terminal layout, reuse the same mask setup.
This saves time before calls and makes your demos more consistent. It also reduces the chance of forgetting to hide a field when you are moving quickly.
What to hide before sharing your screen
Use this checklist before important demos, customer calls, tutorials, interviews, reviews, and public recordings.
Hide or remove:
- Customer names, emails, phone numbers, addresses, and avatars
- Account balances, revenue, costs, salaries, and private metrics
- API keys, access tokens, private URLs, secrets, and internal IDs
- Internal project names, roadmap labels, feature flags, and admin controls
- Chat messages, notification previews, calendar details, and personal notes
- Browser bookmarks, autocomplete suggestions, and recently visited pages
- File paths, repository names, environment names, and machine-specific details
You do not need to hide everything. You need to hide the parts that create risk, distraction, or unnecessary context.
When to create a fake demo environment instead
Screen masks are useful, but they are not a replacement for every privacy practice.
Use fake demo data or a separate demo environment when the entire workflow is sensitive, when many fields need to be hidden, when users may inspect the recording frame by frame, or when compliance rules require sanitized data.
Use masks when the screen is mostly safe and only specific areas need to be covered, blurred, or dimmed.
In many practical situations, the best setup is both: a reasonably clean demo environment plus a few masks for fields that still should not appear.
FAQ
Can I hide only one part of my Mac screen during a call?
Yes. Cloaky lets you place a live mask over a selected area while the rest of the screen remains visible and usable.
Can I blur sensitive information instead of covering it with a box?
Yes. Blur is useful when you want viewers to understand the interface layout without reading the private details.
Will a screen mask appear in Zoom, Google Meet, Microsoft Teams, or recording tools?
It depends on the capture mode. Full-display sharing usually captures what is visible on screen. Single-window capture can behave differently, so test your exact setup before sharing anything sensitive.
Does Cloaky change the app underneath?
No. Cloaky draws masks on top of your Mac screen. The original app, page, document, or dashboard stays unchanged.
Is this only for remote meetings?
No. Screen masks are also useful for recorded tutorials, office displays, in-person reviews, classroom demos, livestreams, and focused work.
Keep the screen useful without exposing everything
Screen sharing privacy is usually not about hiding the whole screen. It is about hiding the few details that do not belong in the meeting.
Cloaky helps you cover, blur, dim, or hide sensitive areas on your Mac so you can keep presenting, recording, teaching, reviewing, and working without rebuilding the entire workspace.
For the broader version of this workflow, see how to cover or blur part of your Mac screen.